We can use LOOKUPSs in Excel to search for a value in a column or row, and return a value from a matching column or row.
We look at them in a lot of depth on both our Excel Advanced and Excel Advanced Formulas and Functions courses.
There are a number of lookup and reference functions in Excel and Microsoft adds more to give us more efficient solutions. Many Excel users use the VLOOKUP function and really like the functionality, but the VLOOKUP has many limitations and is also very memory heavy.
If you are working with large data sets in particular, the VLOOKUP can turn into a nightmare. The VLOOKUP must store all the data from the table arrays in the computer’s memory. This can crash Excel. The file becomes difficult to work with because the file is too slow.

In this blog post you will see how the much more efficient XLOOKUP can replace the VLOOKUP and HLOOKUP. If you have knowledge of using the INDEX and MATCH function, the logic of the XLOOKUP function will make a lot of sense!
The structure of the XLOOKUP (arguments inside square brackets are optional)
=XLOOKUP(lookup_value, lookup_array, return_array, [if_not_found], [match_mode], [search_mode])
The lookup_value is the value to search for. If you enter nothing, the function will search for blank cells.
The lookup_array is the array or range in which you want to search for the lookup_value.
The return_array is the array or range to return value from.
The [if_not_found] is where a valid match is not found, return the [if_not_found] text you supply.
The [match_mode] is 0 an exact match, 1 Exact match. If none found, return the next larger item, -1 Exact match. If none found, return the next smaller item, and 2 A wildcard match.
The [search_mode] XLOOKUP can perform a search starting at the first item. This is the default or perform a reverse search starting at the last item.
Example 1 – XLOOKUP exact match
A company wants to increase prices for their products. They have a price list from last year and want to lookup the last year’s prices to this year’s price list.
The products are identified by a unique product ID, which will be used as the lookup value.
Last year’s price list. Below you can see two product ID columns. The reason for this is just to be able to explain how the XLOOKUP is superior to the VLOOKUP.

Below you can see the new price list and in column “Last year price” the LOOKUP

In this example A5 is the lookup value. The ID to identify the product.

The lookup array here is on the sheet with last year’s prices. If you are used to use VLOOKUP the lookup value can only be found in the first column of the table array. It means that we can only use the VLOOKUP function if the data is organised the right way. The XLOOKUP does not have this limitation.

Next argument return array is the column, Price. The XLOOKUP needs to return the price for the product identified by the lookup value.

The [if_not_found] argument has many uses. If the VLOOKUP cannot find the lookup value, it will return an #N/A! error. You can tell the XLOOKUP what to return if their is not an exact match to the lookup value. In this example, some new products have been added to the new price list and the XLOOKUP has to return “New Product” if it cannot find the lookup value.
The XLOOKUP needs to find exact match so 0 is entered in the [match_mode] argument. The last argument [search_mode] is not used here, but you will find an example of this later in this blog post.
The finale function:
=XLOOKUP(A5,’Product Prices 2022′!$E$4:$E$18,’Product Prices 2022′!$D$4:$D$18,”New Product”,0)
This will return the prices last year for products identified by the product IDs. Product ID 16 and 17 where not on the last year’s price list, that is why the XLOOKUP return New Product.

Example 2 – XLOOKUP approximate match
Next step is to look up the price increase percentage. Top right corner below you can see the table with the increase percentages. If the price last year was between 0 and 50 the XLOOKUP should look up 5%, between 50 and 100; 4%, between 100 and 150 etc.

The XLOOKUP will look like this:
=XLOOKUP(D5,$H$2:$H$7,$I$2:$I$7,,-1)
The lookup value is the price last year, the lookup array is the price range column, the return array the Raise % column, the [if not found] is bypassed, and [match mode] is -1 one, to find exact match or nearest lowest match.

Example 3 – XLOOKUP two ways lookup value (horizontal and vertical lookup)
The XLOOKUP function replace both the VLOOKUP and the HLOOKUP. You will have to use two XLOOKUPs to do a two ways lookup. The first to find the right row and the second to find the right column.
In this example the XLOOKUP needs to return the product category or product name for a product identified by a product ID.
To find the right row we will use the product ID as lookup value. Here entered in E2. The lookup array is column A, where all the product IDs are listed.
=XLOOKUP(E2,A5:A21
It is in the argument return array, we need to nest the second XLOOKUP.
To find the right column, we can use the product category or product nameas lookup value. Here entered in F1. The lookup array is the range B4:C4. The return array is the range now for both XLOOKUPs the range B5:C21. Excel will bypass the rest of the arguments, because we do not need them in this example.
=XLOOKUP(E2,A5:A21,XLOOKUP(F1,B4:C4,B5:C21))

Example 4 – XLOOKUP search bottom to top for value
You can define if you want the XLOOKUP to search top to bottom or bottom to top for the lookup value. How can this be useful? Normally it doesn’t matter, but in some situations this option can be a game changer.
In this example sales meeting details are listed by date, and we need to find the details from the last meeting with a specific customer. By using the customer’s name as the lookup value and search from bottom and up, the XLOOKUP will return the information needed.

To get the date the XLOOKUP looks like this (the last argument -1 is the [search mode] bottom to top).
=XLOOKUP(F3,B2:B21,A2:A21,,0,-1)
And to lookup the sales mount.
=XLOOKUP(F3,B2:B21,C2:C21,,0,-1)
You can see the result of the two XLOOKUPs below top right.

Example 5 – XLOOKUP find a start point and an end point in a range
In this example we need to sum a range, and we can use the XLOOKUP function to find a start point and an end point in the range.
We use the SUM function to sum the range. In the first XLOOKUP the lookup value is the start date, the lookup array is the column with all the meeting dates, the return array is the column order amounts, and 1 in the argument [match mode] is to get exact match or nearest higher match.
In the second XLOOKUP the lookup value is the end date, the lookup array is the column with all the meeting dates, the return array is the column order amounts, and -1 in the argument [match mode] is to get exact match or nearest lower match.
=SUM(XLOOKUP(G9,A2:A21,C2:C21,,1):XLOOKUP(H9,A2:A21,C2:C21,,-1))

Example 6 – XLOOKUP use wildcards lookup value
You can lookup a part of a text string by using wildcards. Here are some examples of Wildcards:
? (question mark) Use a question mark for any single character.
For example, Mart?n finds “Martin” and “Martyn.”
* (asterisk) Adding the asterisk finds any number of characters.
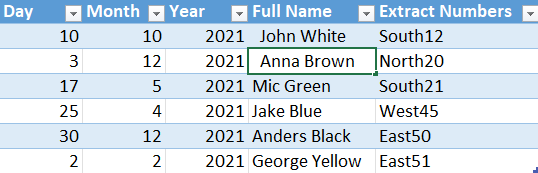
For example, *west finds “Northwest” and “Southwest”.
Conclusion
XLOOKUP is a much more efficient function than VLOOKUP and HLOOKUP. The XLOOKUP does not have all the limitations a VLOOKUP have. You get much more options by using the XLOOKUP.